Welcome to the world of herringbone stitch, a favourite in bead weaving that’s growing in South Africa. This method is known for its beauty and versatility. It lets crafters make stunning jewellery with seed beads.
Are you interested in making tubular herringbone bracelets or flat herringbone necklaces? This guide will help you become a pro. We’ll cover the basics, its use in modern jewellery, and why it’s loved in South Africa.
We’ll talk about picking the right seed beads and controlling tension. These are key to starting your herringbone stitch adventure. Get ready to be creative and join the South African bead weaving community!
Key Takeaways
- Herringbone stitch is a versatile bead weaving technique
- It’s popular for creating both tubular and flat jewellery designs
- Seed beads are the primary material used in herringbone stitch
- The technique is gaining popularity among South African crafters
- Mastering tension is crucial for successful herringbone stitch projects
Introduction to Herringbone Stitch Beading
The herringbone stitch is a fascinating bead technique loved by crafters everywhere. It comes from African traditions. Now, it’s a favourite craft in South Africa.
The History and Origins of Herringbone Stitch
The herringbone stitch comes from the Ndebele people of South Africa. It has a long history. Ndebele women used it to make beautiful beaded clothes and accessories.
Why Herringbone Stitch is Popular in Bead Weaving
The bead boutique world loves herringbone stitch for its beauty and flexibility. It’s great for making flat and tubular designs. This makes it perfect for many types of jewellery.
Basic Materials Needed for Herringbone Stitch
To begin with herringbone stitch, you need a few basic things:
| Material | Description | Importance |
|---|---|---|
| Beads | Seed beads or cylinder beads | Form the main structure |
| Thread | Nylon or polyester beading thread | Holds beads together |
| Needles | Beading needles (size 10-13) | For threading beads |
| Scissors | Small, sharp scissors | For cutting thread |
With these items, you’re set to start your herringbone stitch journey. You’ll make amazing pieces that celebrate Ndebele bead work’s rich heritage.
Understanding the Fundamentals of Herringbone Stitch
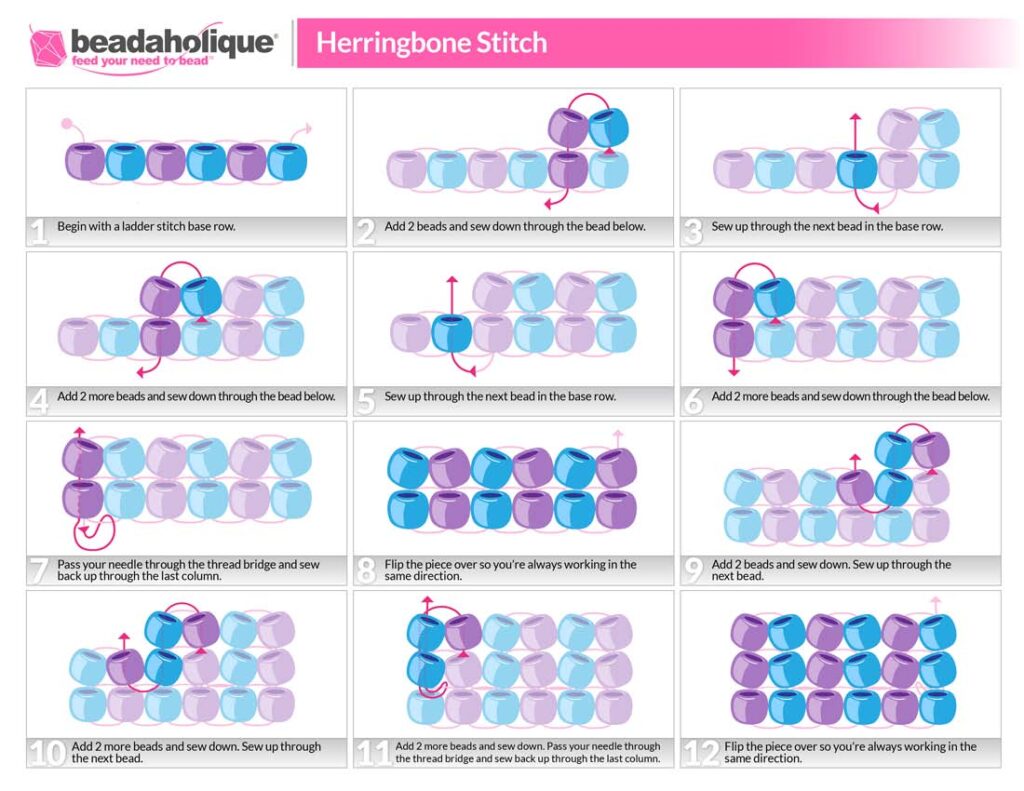
The herringbone stitch is a favourite in bead weaving. It starts with a ladder stitch foundation. This is the base of your creation.
To start, thread your needle and tie two beads together. Then, pass the needle through these beads again, making a tight loop.
Keep adding beads in pairs, making a row that looks like a ladder. This first row is key to your piece’s structure. After setting your foundation, you can start the herringbone pattern.
To weave the herringbone pattern, pick up two beads. Then, pass your needle through the second-to-last bead in the last row. Next, thread back through the first bead you added. This makes a V-shape, a key part of the herringbone stitch.
Keep doing this, moving across the row. Each column will slant slightly, adding texture to your work. As you go, the beads will fit together tightly, making your weave strong and flexible.
“The herringbone stitch is like a dance between needle and thread, where each bead finds its perfect place in the pattern.”
With practice, you’ll get the hang of it. You’ll add beads smoothly, creating rows of beautiful herringbone stitches. Remember, keeping your tension even is crucial for a professional look in your bead weaving.
Getting Started: Preparing Your Beading Workspace
Starting your bead weaving 101 journey means setting up a proper workspace. A well-organised area is key for efficient and fun herringbone stitch beading.
Essential Tools for Herringbone Stitch Beading
To begin your beading adventure, you’ll need a few key items:
- Beading needles
- Beading thread
- Scissors
- Bead stoppers
- Bead mat or tray
Choosing the Right Beads and Thread
Choosing the perfect beads and thread is crucial for your project’s success. Pick beads that match in size and shape. Seed beads, cylinder beads, and drop beads are popular choices.
For thread, nylon or polyester works well. They are strong and flexible.
| Bead Type | Size | Best for |
|---|---|---|
| Seed Beads | 11/0 – 15/0 | Intricate patterns |
| Cylinder Beads | 11/0 – 15/0 | Uniform stitch work |
| Drop Beads | 3x5mm – 3x7mm | Accent pieces |
Setting Up Your Beading Surface
Make your beading area comfortable with good lighting. Use a bead mat to keep your beads in place. Organise your beads in small containers for easy access.
Remember, a tidy workspace makes stitching smoother and more enjoyable.
Mastering the Basic Herringbone Stitch Technique
The herringbone stitch is a versatile beading technique that creates a beautiful zigzag pattern. To start, thread your needle and pick up two beads. These will form the foundation of your first row.
Pass your needle through the first bead again, creating a loop. This sets up the distinctive V-shape of the herringbone stitch. For the next row, pick up two more beads and pass through the top bead of the previous pair.
Keep going, always picking up two beads and passing through the top bead of the previous stack. As you work, you’ll see the herringbone pattern emerge. Remember to keep your tension even to ensure your beadwork looks neat and professional.
Here’s a quick reference guide for the basic herringbone stitch:
| Step | Action |
|---|---|
| 1 | Pick up two beads |
| 2 | Pass through first bead again |
| 3 | Pick up two beads for next row |
| 4 | Pass through top bead of previous pair |
| 5 | Repeat steps 3-4 |
As you get more comfortable, try different bead sizes and colours. The last bead in each row becomes the first bead of the next, creating a seamless flow in your work.
Advancing to Tubular Herringbone Stitch
Tubular herringbone stitch is a step up in beadwork. It makes a three-dimensional tube great for bracelets and necklaces. Let’s dive into mastering this stitch.
Creating a Seamless Tube with Herringbone Stitch
Begin with a flat base of two rows for tubular herringbone stitch. Then, join the ends to make a circle. The tube will grow as you work, keeping an even number of beads for a smooth look.
Tips for Maintaining Tension in Tubular Herringbone
Keeping tension even is key for a uniform tube. Keep your thread tight but not too tight. Practice stepping up at the end of each row to avoid gaps.
Incorporating Embellishments in Tubular Designs
After mastering the basic stitch, add embellishments. Use big beads, crystals, or unique shapes for patterns. Try different colours for stunning effects.
| Embellishment Type | Effect on Tubular Design | Difficulty Level |
|---|---|---|
| Seed Beads | Subtle texture changes | Beginner |
| Crystals | Sparkle and shine | Intermediate |
| Shaped Beads | Unique patterns and textures | Advanced |
With practice, you’ll make beautiful tubular herringbone designs. They’ll show off your beadwork skills.
Exploring Variations: Flat Herringbone and Beyond
Flat herringbone stitch is great for creative beadwork. It makes a smooth, ribbon-like pattern perfect for bracelets and necklaces. Start by passing the needle through the bead of the next column, keeping the tension even.
By mixing herringbone with other stitches, you open up new possibilities. Try adding peyote or square stitch for different textures and designs. These combinations let you create intricate patterns and unique structures in your jewellery.
“The beauty of herringbone lies in its adaptability. It’s a stitch that grows with you as you explore new variations and combinations.”
Play with different bead sizes and shapes to get interesting effects. Using seed beads with larger focal beads adds depth and interest. Make sure to adjust your tension when using various bead sizes.
| Stitch Combination | Effect | Difficulty Level |
|---|---|---|
| Herringbone + Peyote | Textured surface | Intermediate |
| Herringbone + Square Stitch | Rigid structure | Advanced |
| Flat Herringbone + Embellishments | Decorative edges | Beginner-Friendly |
As you get better at these variations, you’ll find endless ways to make unique, stunning jewellery. Your skills and creativity will shine through in every piece.
Herringbone Stitch Beading: Creating Stunning Jewellery
Herringbone stitch beading lets you make beautiful jewellery. It’s a flexible method for making bracelets and necklaces that show off your talent.
Designing Herringbone Bracelets and Necklaces
For bracelets, mix bead sizes for texture. Necklaces can have a big bead or pendant as a highlight. Try different colours for a bold look.
Adding Clasps and Finishes to Your Creations
Choosing the right clasp is key for both looks and function. Toggles are good for bracelets, and lobster clasps for necklaces. Finish with clear nail varnish to keep knots in place.
Incorporating Focal Beads and Embellishments
Make your designs pop with embellishments. Use pearls or fringe for a unique touch. Crystal beads add sparkle and depth.
- Use large, colourful beads as focal points
- Add fringe to bracelet ends for movement
- Incorporate pearls for elegance
- Experiment with crystal beads for sparkle
Mastering these techniques lets you make standout jewellery. Let your creativity guide you in every piece.
Troubleshooting Common Herringbone Stitch Challenges
Learning herringbone stitch can be tricky at first. But with practice, you’ll see your work improve. You might face some problems as you add more beads. Let’s look at common issues and how to fix them.
Uneven tension is a common problem. To keep it even, gently pull your thread after each stitch. This makes your shapes and colours look the same. If your columns twist, try using a bigger needle or adjust your thread path a bit.
Starting a new thread can be hard. When your thread runs out, weave it through several beads before tying it off. Then, start your new thread by weaving it through the same path but in the opposite direction. This makes the transition smooth.
- Use a beading mat to prevent beads from rolling away
- Work in good lighting to better see your stitches
- Take breaks to avoid eye strain and maintain precision
Getting better at herringbone stitch takes time. Don’t worry if your first tries aren’t perfect. With patience and practice, you’ll make beautiful herringbone stitch designs.
Conclusion
Herringbone stitch is a true gem in the world of bead weaving. It’s loved for its versatility in both flat and tubular designs. This makes it a favourite among beadwork enthusiasts in South Africa and beyond.
From elegant bracelets to intricate necklaces, this technique offers endless possibilities. It lets you express your creativity in many ways.
Mastering herringbone stitch takes patience and practice. The journey from basic stitches to complex patterns is rewarding. It allows you to create stunning pieces that reflect South African beadwork traditions.
Remember, each bead you weave is a step towards perfecting your craft. It’s a journey worth taking.
We hope this guide has inspired you to dive into the colourful world of herringbone stitch beading. Whether you’re a beginner or an experienced beader, there’s always something new to discover. So pick up your beads, thread your needle, and let your imagination soar with this beautiful technique. Happy beading!
FAQ
What is herringbone stitch beading?
Herringbone stitch beading is a technique for making jewellery. It uses beads woven in a special pattern. This makes the jewellery strong and pretty.
Why is herringbone stitch so popular in South Africa?
In South Africa, herringbone stitch is loved for its history and beauty. It’s especially dear to the Ndebele people. They use it to make colourful jewellery and decorations.
What materials do I need to get started with herringbone stitch beading?
You’ll need seed beads, beading thread, scissors, beeswax, and a needle. You might also want bead mats, magnifiers, or lights.
How do I create the initial ladder stitch foundation for herringbone stitch?
Start by picking up two beads and leaving a tail. Then, pass the needle through the first bead again. Keep adding two beads at a time, passing through the second bead of the pair before. This makes your foundation row.
What are some tips for maintaining tension in herringbone stitch?
Keeping the tension even is key. Use beeswax to stiffen the thread. Pull the thread gently after each stitch. Don’t pull too tight or too loose.
How do I create a tubular herringbone stitch structure?
For a tube shape, step up at the end of each row. Pass the needle through the first bead of the previous row. This makes a seamless tube.
Can I incorporate other bead weaving stitches with herringbone stitch?
Yes! You can mix herringbone with stitches like peyote or square stitch. This opens up new design possibilities.
How do I add clasps and finishes to my herringbone stitch jewellery pieces?
To add clasps, create loops or reinforced ends with beads or thread. Then, attach the clasps or findings to finish your piece.
What are some common challenges faced when working with herringbone stitch?
Challenges include keeping tension even and avoiding twisted columns. Also, changing thread or colours can be tricky. But, with practice, you can master these.