Welcome to the world of ladder stitch! I’m excited to guide you through this essential bead weaving technique. Ladder stitch is a fundamental skill that opens up endless possibilities in beadwork. In this tutorial, we’ll explore the ins and outs of this versatile method, perfect for creating stunning jewelry pieces.
Whether you’re a beginner or looking to refine your skills, this step-by-step guide will help you master ladder stitch. We’ll cover everything from basic techniques to advanced applications, ensuring you have all the tools to create beautiful beaded creations.
Get ready to dive into the colorful world of beads and thread as we embark on this exciting journey together. By the end of this tutorial, you’ll be well-equipped to incorporate ladder stitch into your beadwork projects with confidence and creativity.
Key Takeaways
- Ladder stitch is a fundamental bead weaving technique
- This tutorial covers basic to advanced ladder stitch methods
- Learn essential tools and materials for successful beadwork
- Discover how to troubleshoot common ladder stitch issues
- Explore creative ways to use ladder stitch in jewelry making
- Gain tips for achieving professional-looking results
Introduction to Ladder Stitch Beading
Ladder stitch is a key beading technique used in many jewelry designs. It’s strong and versatile, making it perfect for various projects. Let’s explore the world of ladder stitch and its importance in jewelry making.
What is Ladder Stitch?
Ladder stitch connects seed beads side by side, like a ladder. It’s a solid base for complex patterns and simple designs alike.
Why Learn Ladder Stitch?
Learning ladder stitch opens up many possibilities in beadwork. It’s a must-have skill for making beautiful jewelry. Plus, it’s easy to learn, great for beginners.
Applications in Jewelry Making
Ladder stitch is used in many jewelry pieces. I use it for bracelets, necklaces, and earrings. Its flexibility lets you create endless designs, from delicate pendants to bold pieces.
“Ladder stitch is the unsung hero of beadwork, quietly supporting intricate designs while shining in its own right.”
As we dive deeper into ladder stitch, you’ll see how it can improve your jewelry-making skills.
Essential Tools and Materials for Ladder Stitch
I’m excited to share the key supplies you’ll need for ladder stitch beading. Let’s dive into the essentials that will set you up for success!
First on our list is the needle. Choose a beading needle that’s thin enough to pass through your beads multiple times. I prefer size 10 or 12 needles for most projects.
Next up is thread. Beading thread comes in various types, but I recommend FireLine or Wildfire for their strength and durability. These threads are perfect for ladder stitch as they resist fraying and tangling.
Now, let’s talk beads. Delica beads are ideal for ladder stitch due to their uniform shape and size. They create clean, straight lines that are essential for this technique.
Here’s a quick reference table of the supplies you’ll need:
| Supply | Recommended Type | Why It’s Important |
|---|---|---|
| Needle | Size 10 or 12 beading needle | Thin enough for multiple passes through beads |
| Thread | FireLine or Wildfire | Strong, durable, and resistant to fraying |
| Beads | Delica beads | Uniform shape for clean lines |
| Scissors | Sharp, small scissors | Precise cutting of thread |
| Bead mat | Flocked or beading mat | Prevents beads from rolling away |
With these tools and materials, you’re all set to start your ladder stitch journey. Remember, quality supplies make a big difference in your final product!
Preparing Your Beading Workspace
A well-organized workspace is key to enjoying your beading projects. I’ll share my tips for creating the perfect beading area in your home.
Organizing Your Supplies
I keep my beading thread, working thread, and other supplies in clear containers. This makes it easy to find what I need. A small cart with drawers is perfect for storing beads by color or size. I label each drawer to save time when searching for specific items. Precious Daisy was a great colour range of Miyuki Delica Beads as well as Miyuki Round Rocailles Seed Beads

Setting Up Proper Lighting
Good lighting is crucial for beading. I use a bright desk lamp with adjustable settings. Natural light is great, but be careful of direct sunlight as it can fade some bead colors. Position your light source to avoid casting shadows on your work area.
Choosing a Comfortable Work Surface
I prefer a sturdy table at a comfortable height. A beading mat helps keep beads from rolling away. I use a cushioned chair with good back support to maintain proper posture during long beading sessions. Keep your supply cart within reach to minimize stretching and strain.
By setting up your workspace thoughtfully, you’ll enjoy your beading projects even more. Remember, a tidy area leads to better focus and creativity!
Step-by-Step Guide to Basic Ladder Stitch
Ready to start your ladder stitch journey? Let’s dive in! I’ll guide you through making a beautiful row of beads with this essential technique.
First, thread your needle and tie a knot at the end. Pick up two beads and slide them to the knot. These form your first bead pair.
Now, here’s where the magic happens. Pass your needle back through the second bead. This creates the foundation of your ladder. Next, pick up two more beads and pass through the last bead of your previous pair.
Continue this pattern: string two beads, pass back through the second bead of the new pair and the last bead of the previous pair. This forms your thread path, creating a strong, flexible row of beads.
To finish, weave your needle back through several beads and tie off. Trim any excess thread.
| Step | Action | Result |
|---|---|---|
| 1 | Pick up two beads | First bead pair |
| 2 | Needle back through second bead | Foundation stitch |
| 3 | Pick up two, pass through last bead | Growing row of beads |
| 4 | Repeat step 3 | Completed ladder stitch |
Practice makes perfect! Soon, you’ll be creating stunning ladder stitch designs with ease.
Common Mistakes and How to Avoid Them
Learning ladder stitch can lead to mistakes. I’ll cover some common errors and how to avoid them. By fixing these issues, you’ll make stunning beadwork that looks neat and professional.
Uneven Tension
Keeping the tension even is vital. If it’s not consistent, your work will look off. To fix this, pull the thread with the same force for each stitch. A beading mat can help keep your work steady.
Incorrect Bead Alignment
Getting the beads in line is crucial for a clean look. If they’re not aligned, your piece will look messy. Use a beading needle to guide the beads into place. Take your time to position each bead before tightening the thread.
Thread Management Issues
Bad thread management can cause tangles and weak spots. To strengthen your work and prevent these issues:
- Use a thread conditioner to reduce tangling
- Weave your thread through completed sections to strengthen the piece
- Trim excess thread neatly to avoid bulky knots
By tackling these common problems, your ladder stitch projects will be strong, beautiful, and professional. Remember, practice makes perfect. Don’t get discouraged if your first tries aren’t perfect.
Advanced Ladder Stitch Techniques
I’ve tried many ladder stitch variations over the years. These advanced techniques can elevate your beading. Let’s explore some exciting ways to enhance your projects.
One fun variation is using two needles for a first pass. This creates a wider base, similar to brick laying. You can build intricate patterns on this foundation. Mixing bead sizes adds texture and visual interest.
Here’s a breakdown of some popular advanced ladder stitch techniques:
| Technique | Description | Difficulty Level |
|---|---|---|
| Two-Needle Ladder | Uses two needles for a wider base | Intermediate |
| Mixed Bead Sizes | Incorporates various bead sizes for texture | Advanced |
| Pattern Stitch | Creates intricate designs with color variations | Expert |
Experimenting with different bead shapes can lead to stunning results. Try using daggers or drops in your ladder stitch for a unique look. The key is maintaining even tension throughout your work.
Remember, practice makes perfect. Don’t be afraid to try new patterns and push your creativity. With these advanced techniques, your ladder stitch projects will stand out from the crowd.
Incorporating Ladder Stitch into Your Beading Projects
Ladder stitch is a versatile technique that can elevate your beading projects. I love using it to create beautiful beaded jewelry that’s sure to turn heads. Let’s explore some exciting ways to incorporate this stitch into your designs.
Bracelets and Anklets
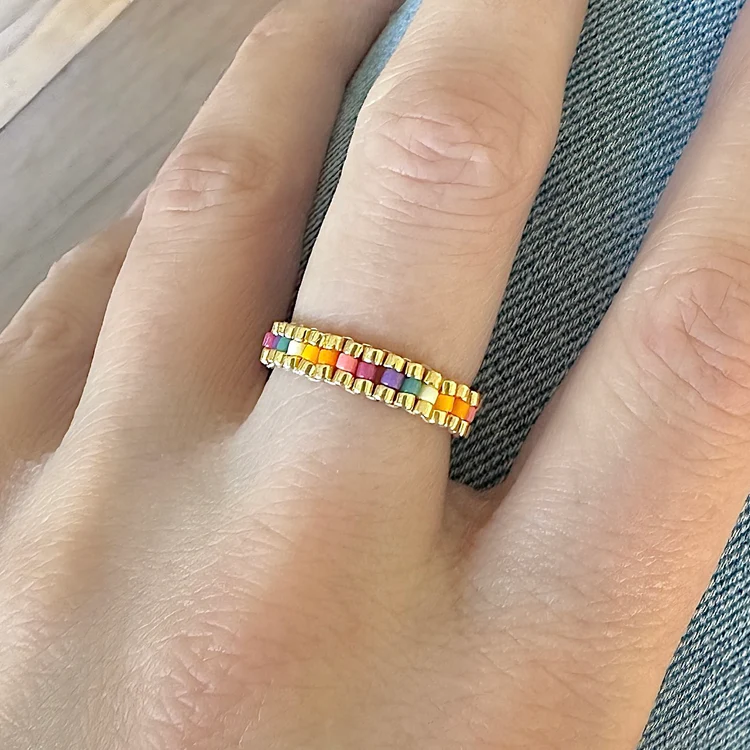
Ladder stitch shines when making bracelets and anklets. I often use colorful round beads to create stunning patterns. The technique allows for a snug fit, perfect for these accessories. Imagine a bracelet with alternating pink and blue beads, catching the light with every movement.
Necklaces and Pendants
For necklaces, ladder stitch offers endless possibilities. I like to create a base using this technique, then add pendants or charms. It’s amazing how a simple strand can transform into a statement piece. Try mixing different bead sizes for added texture and visual interest.
Embellishments for Other Crafts
Don’t limit ladder stitch to just jewelry! I’ve used it to embellish handbags, create bookmarks, and even decorate picture frames. The technique adds a touch of sparkle to any project. For crafters who love sale alerts, stock up on beads when they’re discounted to experiment with new ideas.
Remember, practice makes perfect. Start with simple designs and gradually increase complexity. Before you know it, you’ll be creating stunning ladder stitch projects that showcase your creativity and skill.
Troubleshooting and Tips for Perfect Ladder Stitch
Mastering the ladder stitch is easier than you think. Always thread back through your beads often. This keeps your work neat and secure.
If you need to exit your work, weave your thread through a few beads first. This anchors it well.
Getting the right tension is crucial. It should be consistent but not too tight. If your beads look uneven, adjust your tension as you go.
Remember, practice makes perfect. Don’t worry if your first attempts aren’t perfect. You can find a free tutorial on our website to help you improve.
Join our beading community for more tips and tricks. Follow us on social media for exclusive coupon codes for beading supplies. With these tips and practice, you’ll be making stunning ladder stitch jewelry in no time!
FAQ
What is ladder stitch and why should I learn it?
Ladder stitch is a key bead weaving technique. It’s strong and versatile, used in many projects. Learning it helps you make stunning jewelry and accessories.
What supplies do I need for ladder stitch beading?
You’ll need seed beads, a beading needle, and thread like Wildfire. The right tools and materials are essential for great results.
How do I set up my workspace for ladder stitch beading?
Organize your supplies and ensure good lighting. Choose a comfortable work surface. A well-set workspace makes beading better.
Can you explain the basic steps of ladder stitch?
Sure! Start by stringing a bead, then pick up two more. Pass the needle back through the second bead. Keep adding rows of beads. I’ll guide you through it step by step.
What are some common mistakes to avoid when learning ladder stitch?
Mistakes include uneven tension and wrong bead alignment. Thread management is also key. I’ll show you how to avoid these issues.
Are there any advanced ladder stitch techniques I should know?
Yes! Once you get the hang of it, try using different bead sizes and patterns. You can also use it as a base for other stitches.
What kinds of projects can I make with ladder stitch?
Ladder stitch is great for many projects. You can make bracelets, anklets, necklaces, pendants, and more. I’ll show you some beautiful ideas.
Do you have any troubleshooting tips for perfecting ladder stitch?
Absolutely! I’ll share tips and tricks for professional-looking beadwork. We’ll cover common problems and solutions.
What is bead weaving and how is it related to ladder stitch?
Bead weaving is a technique used to create intricate designs with beads by stitching them together using various methods, including the ladder stitch. The ladder stitch is often used as a base for other bead weaving stitches, allowing you to create complex patterns and structures.
How do I make a ladder stitch in bead weaving?
To make a ladder stitch, start by threading your needle with a length of thread. String beads onto the thread to form the base row. Then, using the ladder stitch technique, you will attach the next row of beads by going through the previous bead and reinforcing with additional stitches.
Can I use the ladder stitch to create variations in my bead weaving projects?
Yes, the ladder stitch can be adapted to create variations in your bead weaving projects. You can modify the number of beads per stitch or the spacing between rows to achieve different effects, including incorporating techniques from other stitches like herringbone and brick stitch.
How can I reinforce my ladder stitch when bead weaving?
To reinforce your ladder stitch, you can go back through the third bead in the previous row after adding new beads. This adds strength to your work and ensures that your design holds together well, especially if you’re using larger beads or working on a larger project.
What types of beads are best for ladder stitch bead weaving?
The best beads for ladder stitch bead weaving include Czech beads and other similar types that have consistent shapes and sizes. These beads allow for a more uniform stitch and help maintain the integrity of your design.
Is the ladder stitch only used for flat designs in bead weaving?
While the ladder stitch is often associated with flat designs, it can also be used to create three-dimensional structures by stacking rows of beads. This technique can lead to unique shapes and forms, expanding the possibilities of your bead weaving projects.
Can I follow a tutorial for a specific ladder stitch project?
Absolutely! There are many tutorials available online that provide step-by-step instructions on how to make a ladder stitch. These tutorials often include tips on how to attach beads, reinforce your stitches, and even variations to try.
How do I attach a new thread when my current thread runs out while using ladder stitch?
To attach a new thread, tie a secure knot at the end of the old thread and weave it back through several beads to hide the knot. Then, thread the new thread through the needle and continue your ladder stitch by starting at the next row of beads.
What is the difference between ladder stitch and other bead weaving stitches like herringbone and brick stitch?
Ladder stitch is a straightforward technique that creates a linear design, while herringbone and brick stitch involve more complex movements and can create different textures and patterns. Each stitch has its own unique characteristics and can be used in combination to enhance your bead weaving projects.